

Walkthrough: Upgrading to FileMaker 17
Upgrading to FileMaker 17
By Eric Sterbenk
I’ve finally jumped on the bandwagon; I’ve upgraded to the FileMaker 17 Platform. I know, I’m a developer and I should have done it as soon as it released, right?! I have no good excuses, but better late than never. So here’s how I navigated the upgrade process.
NORTH
I downloaded the installer file and installed it, so far so good. I opened the file for the first time and immediately noticed the new My Apps window. This new window provides easy access to My Apps and Recent files as well as a button to Create a file. The new UI is very modern and intuitive.
SOUTH
Okay, stay in my lane…I needed to work on one of my customer files which are hosted on their server. I clicked on the File menu and noticed the Open Remote and Open Favorite options were gone. Actually, there are quite a few changes: My Apps and Hosts have been added to the menu and other items have been renamed, rearranged or removed altogether.
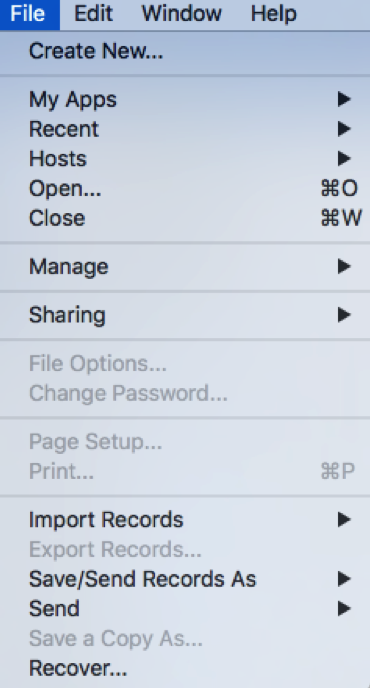
I figured I would find the Open Remote function under Hosts so I clicked it and I hit a bit of a dead end. I had to manually reconfigure my hosts in FileMaker 17. Once I did that, I was back on course.
EAST
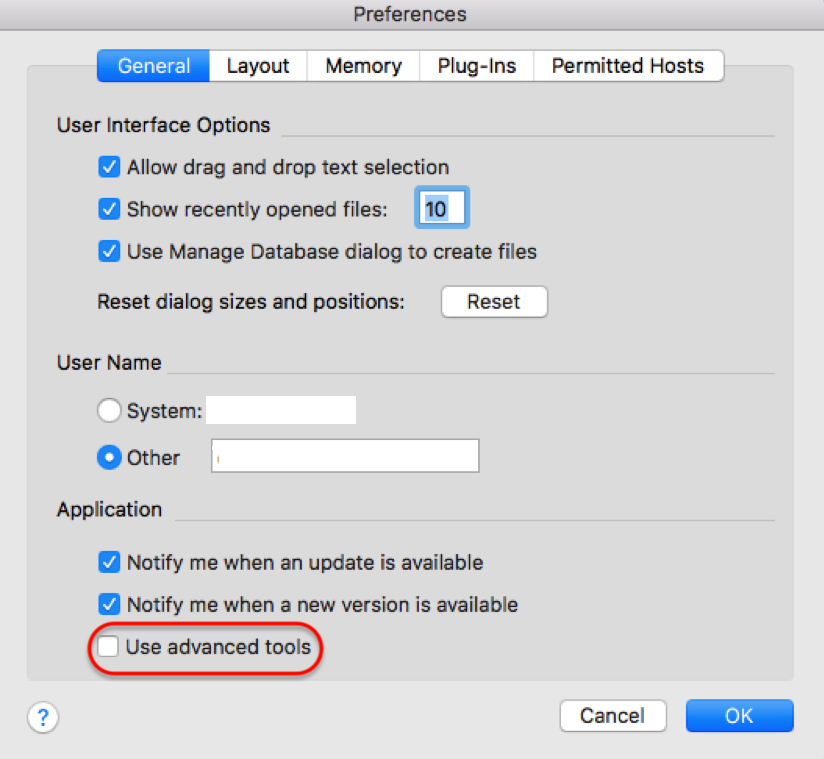
I proceeded to open my client’s files and everything pretty much looked the same as it did in FileMaker 16. This particular client has custom menus but I wanted to switch to the FileMaker default menus, which is an advanced feature. Since FileMaker Pro Advanced is the new desktop, all users now have access to advanced features, but they are disabled by default so you have to manually enable the advanced tools feature and then restart the FileMaker program.
Next, I wanted to create a new table so I pressed Shift-Command-D to open the Manage Database dialog and was pleased to find that it still works in FileMaker 17. This area looks exactly the same as well. I navigated to Tables, typed in my new table name at the bottom and clicked create. Wow! FileMaker 17 automatically creates a series of default fields when you create a new table.

The program automatically creates fields for the primary key, creation and modification dates and the user who created or modified the record. But, I can also customize and specify my own default fields beforehand. What a great shortcut!
WEST
I meandered into layout mode to check out its makeover, but it looked the same. The Inspector palette was floating just as it did before. Then I noticed a new button for showing/hiding panes in the top right corner. I clicked to show the left pane and the Fields/Objects pane appeared. I clicked the right side to show the Inspector pane. Nice, I like the redesign: Fields/Objects list on the left, Layout in the middle and the Inspector on the right. I navigated to the layout I needed and then hid the Field/Objects pane since I just needed the inspector pane at the time.
THE SCENIC ROUTE
When I switched to Browse Mode the window automatically resized. Very cool! So when you transition from Layout Mode to Browse Mode, FileMaker 17 takes the Inspector pane into account and removes that space in Browse Mode. It expands when you move to back Layout Mode.
I noticed that the menu bar looked a little sparse. The back and forward buttons that let you move from one layout to another were gone. I wanted those back so I right clicked on the menu bar in order to display options to customize the Layout menu:
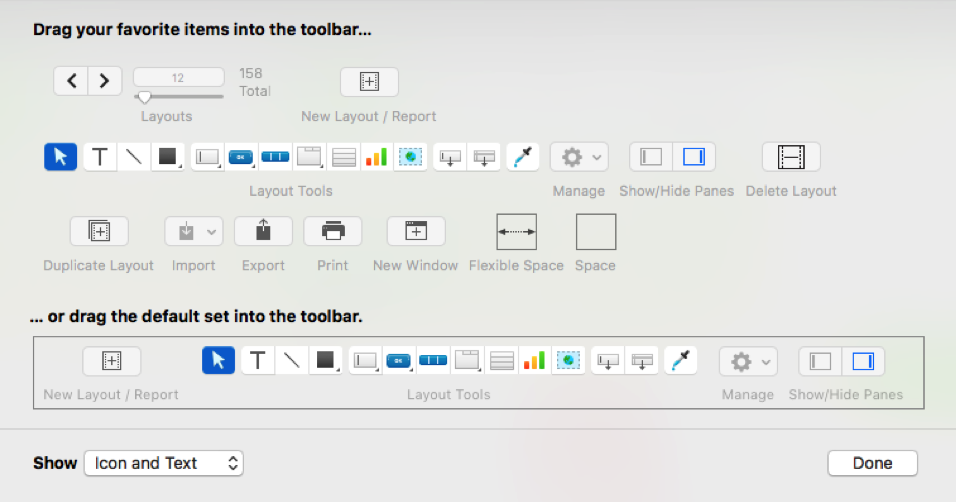
All I had to do was drag the left and right arrows into the toolbar. I removed New Layout button since I alternatively do that through the main menu in order to avoid accidents. I saved my changes by clicking Done and my arrows returned. And now the FileMaker 17 journey begins.
June 11, 2018 @ 8:40 am
Aimed at the beginner or early intermediate user, but with some decent tips for even advanced users.